by Jessie Key, Faculty, Chemistry Department, Faculty of Science and Technology, Vancouver Island University
I have been making video demonstrations and tutorials to augment the learning experience in both the lecture and lab for the courses that I teach. I have put most of my effort into the laboratory portion of the courses CHEM 140 (General Chemistry I) and CHEM 231(Organic Chemistry I). I chose these courses as they introduce the majority of techniques necessary for the entire year and they have the highest enrollment in the chemistry department. My focus on the laboratory components is based on a common student disconnect between the theory involved, and the actions performed in the lab. I believe presenting laboratory theory and technique in easily accessible, short videos helps students to bridge the gap between theory and practice.
To create these videos, I first went through the lab manuals and made a list of the most important techniques and concepts. These are the places that myself and other instructors have noted students struggled with or performed incorrectly. I then applied for a CIEL LITE grant, and received ~450$ to purchase the equipment necessary to make the videos. Unfortunately, I was unable to purchase any software, but made do with freeware available.
The Equipment
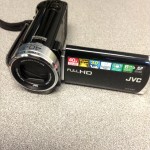 Live action components of the videos were filmed using a JVC 8GB High-Definition Flash Memory Camcorder (GZ-E220BU) (199.99$). This inexpensive lightweight camcorder produced fairly good quality video recording, but had less than ideal audio, memory and battery life. The purchase of a tripod would have likely improved the film quality.
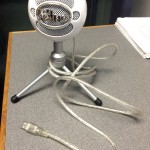 High quality audio voiceovers were recorded using a Blue Microphone SnowBall iCE USB Microphone (78908Q) Model Number: 1974 (99.99$). This is probably my favourite piece of equipment. Plugging directly into my laptop’s USB port, I could immediately record excellent quality audio.
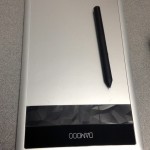 Video annotation was performed using a Wacom Bamboo Capture Pen & Touch Tablet (CTH470M) (99.99$). I found this particular tablet to be very frustrating, as the sensitivity of the device was less than optimal. Stray marks and missed pen strokes made annotation a time consuming chore. I found myself re-writing my annotation several times to achieve a product I was happy with.
The Software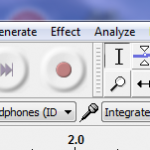
Audio Recording and Editing
Audio recording and editing was performed using the freeware software Audacity (http://audacity.sourceforge.net/). This powerful software is very user friendly and allowed for easy editing of audio. I found audio editing was necessary, as I am definitely not a professional voice actor. I found myself making mistakes, having awkward pauses and saying “umm” all too frequently.
Screen Capture
Screen capture and some light video editing was initially performed using the freeware software Active Presenter (http://atomisystems.com/activepresenter/). This software did a fairly good job of screen capture without a time-limitation or distracting watermark like other freeware software on the market. However, I found it was not optimal for editing of combined audio and video. Unfortunately, near the end of the CHEM 140 set of videos it inexplicably had some major crashes making it unusable. I contacted their user support and tried their recommendations but the software remains unusable to this date.
Currently I use the freeware software Jing (http://www.techsmith.com/jing.html) to perform all of my screen capturing. It has a time limitation of 5 minutes/video, produces lower resolution videos than Active Presenter, and has no editing features. However, it has never crashed!
Video Editing
After the inexplicable crashes by Active Presenter I tried other video editing software including Windows Live Movie Maker (version 2011) and Adobe Premiere Elements 9. Windows Live Movie Maker is the more user friendly of the two, but I found it would often produce videos with glitchey pixelation in places. I switched to using Adobe Premiere Elements 9, which came pre-loaded on my HP laptop. It is certainly less user friendly with a higher learning curve of use, but produces higher quality videos without the glitchey pixelation problem of Windows Live Movie Maker.
Video Distribution:
 Videos were uploaded to Vancouver Island University’s Kaltura based Video Media Repository (VIUTube – Key to Chemistry). VIUTube can accept most popular video file formats, but is limited to a 2 GB upload maximum. I found I often used .avi files, for their decent quality and mid-level file size. The videos were then embedded into the course’s learning management system Desire2Learn. Students could then access videos from essentially any smart device.