Are you interested in using the Groups tool in to create project discussion areas for students? Perhaps you have readings that only certain students should have access to, or what to release additional information for specific learners needing more support.
The Groups tool in D2L will help you organize your course and personalize student learning.
Step 1: Create your groups
(For additional help or information, please see our media wiki here: https://mediawiki.viu.ca/wiki/Groups)
1) Go to “Communications” and choose “Groups”
2) Click on the blue “New Category” button
3) Name your collection of groups so you will be able to easily recognize why you set them up. For example, name the category the same as the task the groups are working on.
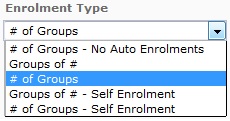
4) Choose your enrolment type. You can manually assign students to groups yourself, have D2L randomly assign students to groups, or have the students self-enroll to the groups.
5) Click the blue “Save” button
Step 2: Add Groups to Content Items
1) Go to “Course Materials” and “Content”.
2) Choose the module that contains the topic you want to group-restrict.
3) Use the drop-down arrow to the right of content name and choose “Edit Properties”.
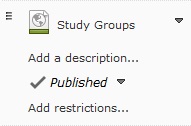
4) Click on the “Add Restrictions …” box that appears under the “Published” checkmark.
5) Under “Release Conditions” select “Create”.
6) Under “Condition Type” choose “Group Enrolment” using the drop-down menu.
7) Under “Condition Details” choose the group you want the topic restricted to.
8) Click the blue “Create” button, and then choose the blue “Update” button.
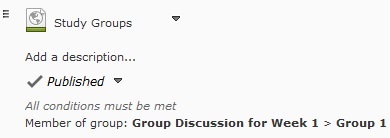
9) You will see the group restriction appear under the “Published” checkmark.
That’s it! For more information, please see our media wiki at : https://mediawiki.viu.ca/wiki/Desire2Learn_Help or contact us at learnsupport (at) viu (dot) ca.